Introduction to Procedural Macros in Rust
Posted on
Table of Contents:
As a newcomer to Rust, I heard the phrase "procedural macro" thrown around a lot without really understanding what it meant. I figured that I would learn about them if I ever needed them. Well, I'm working on the guts of relm, and a large chunk of it is procedural macros. I've learned enough about procedural macros to be dangerous, so I thought I would pass on some knowledge.
The purpose of this post is to give you an overview of the ins and outs of procedural macros so that you feel confident enough to incorporate them into your own Rust arsenal. I'll start off by discussing what makes a declarative macro (macro_rules!) different from a procedural macro, then I'll discuss the different types of procedural macros, how to define them, where to define them, and the basics of packaging them. At the end I'll walk you through making your very first procedural macro. Here's a taste of where we're going to end up:
I've included below a list of other resources you might find helpful. Sometimes you need to hear the same information explained multiple ways before it really sinks in.
- Macros - The Rust Programming Language - First Edition
- Procedural Macros (and custom derive) - The Rust Programming Language - First Edition
- Procedural Macros for Generating Code from Attributes 0 Rust Book
- Macros By Example - The Rust Reference
- Macros - Rust By Example
- Writing complex macros in Rust
- Macros in Rust part 1, part 2, part 3, part 4
- An Overview of Macros in Rust - Steve Klabnik
Declarative Macros
Your first contact with macros is probably macro_rules!. The macro_rules! macro defines a declarative macro. These are great when you want to define a shorthand for something tedious or verbose. For example, I'm working on a revamped parser for the view! macro in relm, and I want to be able to test that it can parse several different examples, so I wrote a macro to make my tests much more concise.
macro_rules! failed {
    ($x:ident) => (format!("failed to parse `{}`", $x).as_str())
}

macro_rules! check_example {
    ($x:ident, $y:path) => ({
        let _parse_result: $y = syn::parse_str($x).expect(failed!($x));
    })
}

macro_rules! check_examples {
    ($x:ident, $y:path) => ({
        for ex in $x {
            check_example!(ex, $y);
        }
    })
}

#[test]
fn parse_message() {
    let examples = vec![
        "Message",
        "Message(x)",
        "Message(x, y, z)"
    ];
    check_examples!(examples, Message);
}
This post isn't about declarative macros, so I'll keep this explanation brief. The failed! macro just generates a formatted string saying failed to parse <whatever the example was>. The check_example! macro lets me test that a given example can be parsed into the given type (Message in this case). The check_examples! macro lets me test several examples at once. I'm not doing anything crazy here, and I'm not doing anything that couldn't be done by hand. I'm just lazy, and I'd like my tests to be short and to the point.
It's entirely possible to write complex, intricate, incredibly useful declarative macros using this syntax, but (to me, at least) these macro definitions become nearly illegible as they get larger. Procedural macros, in my opinoin, are much better suited to writing something non-trivial.
Procedural Macros - Introduction
When you define a macro with macro_rules!, you are writing pattern matching expressions to define what your input should look like, and what output to generate using those matched patterns. When you write a procedural macro, you are handed a fully armed and operational battle station parsed syntax tree, at which point the compiler says "go nuts, just give me back another syntax tree when you're done."
Syntax Trees
Before we get too deep into procedural macros, you'll want to have at least a vague understanding of what a syntax tree is. If you're someone like me that doesn't come from a computer science background, maybe you don't have any idea what a syntax tree is. Well, buckle up, you're going to need to get pretty cozy with this concept.
Let's say we want to parse the definition of a function. How would we represent the pieces of a function definition as a Rust struct? Well, there's obviously the characters fn somewhere, so we'll store that in our struct. There might also be a pub at the front of the definition, so we'll store that as an Option<T> of some kind. Then there are parentheses, so we'll store those too. What about the contents of the parentheses (the arguments)? There might be nothing there, and there might be a bunch of stuff there. The arguments have names, types, and potentially trait or lifetime bounds, so we'll store that as well. This goes on and on until you've built a collection of structs and enums that represent the various bits and pieces of Rust code. This is what the syn crate does for you. We'll come back to syn in a minute.
Types of Procedural Macros
There are three basic kinds of procedural macros: function-like, attribute-like, and custom derive. The procedural macros page in the Unstable Book contains really useful information about how these are different from one another, and how to define them.
Attribute-like
An attribute-like procedural macro can be used to create a custom attribute like this:
#[my_custom_attribute(arg1, arg2)]
struct Foo {
    // struct fields
}
The definition of an attribute-like procedural macro looks like this:
#[proc_macro_attribute]
fn my_custom_attribute(metadata: TokenStream, input: TokenStream) -> TokenStream {
    // do something
}
The first argument is the metadata contained in the attribute i.e. the arguments or values. There are a few different ways to use a custom attribute, so refer back to the Unstable Book for more details. The second argument is the syntax tree of the item that the attribute was applied to (the struct Foo in the example above).
A great example for how to use a custom attribute can be found in the serde crate, where they're used to customize how a struct/enum will be (de)serialized.
Custom Derive
A custom derive is great when you want to make life easier for a consumer of your library. The way a custom derive works is very similar to how a custom attribute works, with some restrictions. A procedural macro for a custom derive only takes one TokenStream as an argument, and can only be applied where the derive attribute is valid i.e. on structs and enums. Here's how it looks:
// in the library consumer's code
#[derive(Foo)]
struct Bar(i32);

// in your proc-macro crate
#[proc_macro_derive(Foo)]
fn derive_foo(input: TokenStream) -> TokenStream {
    // do something
}
Note that the name of the function doesn't have to be derive_<trait name>, that's just what I called it.
Function-Like
A function-like procedural macro is the Wild West of procedural macros. These are valid anywhere as long as their output is valid at the location the macro is invoked. The definition of a function-like macro only takes one TokenStream as input. Here is what one looks like:
// in the library user's code
my_macro!(all kinds of stuff)

// in your proc-macro crate
#[proc_macro]
fn my_macro(input: TokenStream) -> TokenStream {
    // do something
}
Note that in the case of a function-like macro, the macro has the same name as the function you apply the #[proc_macro] attribute to.
Summary
Here are the basics all in one place. Take note of the different attributes applied to each function, and the number of arguments that each function takes.
// custom attribute
#[proc_macro_attribute]
fn my_attribute(metadata: TokenStream, input: TokenStream) -> TokenStream {
    // do something
}

// custom derive
#[proc_macro_derive(TraitName)]
fn my_custom_derive(input: TokenStream) -> TokenStream {
    // do something
}

// function-like macro
#[proc_macro]
fn my_macro(input: TokenStream) -> TokenStream {
    // do something
}
Defining and Packaging Procedural Macros
Let's talk about how and where you define procedural macros.
Packaging
Procedural macros must be defined in their own crates. It's customary to name a crate containing a custom derive macro with the <crate>-derive pattern, where <crate> is the name of the main crate i.e. serde and serde-derive.
The Cargo.toml of your procedural macro crate must be defined as a crate of type proc-macro:
# in Cargo.toml
[lib]
proc-macro = true
Procedural macros are still an unstable feature, so you must also put the following line at the root of your procedural macro crate and the crate using the procedural macro:
#![feature(proc_macro)]
Dependencies
The proc-macro crate is part of the standard library, but you'll need a few other crates to make your macros.
extern crate proc_macro;
extern crate syn;
#[macro_use]
extern crate quote;
We'll go through these one by one.
proc-macro
This crate defines the TokenStream type. There's not much else to see here as the proc_macro crate is intentionally barebones.
syn
When you're writing your procedural macro you're going to have about 40 tabs open that start with syn:: because this crate defines all of the syntax items that your code will get parsed into. For example, this is the page for syn::Expr, which is the enum describing all the various types of expressions. Take a look, I'll wait. Yeah, there's a lot going on there. You'll just have to keep the documentation open while you work. That's not a bad thing though, because there's all kinds of useful stuff in there.
The most recent versions of syn (0.12.x) provide you some really nice tools for creating error messages. Let's say your macro allows the user to write code in a custom syntax. The compiler doesn't know your custom syntax (you can actually make custom parsers with syn, but that's another topic), so you're responsible for parsing your custom syntax and generating valid Rust code from it. If you determine that the user has made a syntax error, you can generate a compiler error pointing to the exact location of the error. I'll show you how to do this in a minute.
quote
The quote crate is basically the opposite of syn in that it generates tokens rather than parsing them. The basic idea is that you use syn to parse strings or tokens into syntax trees, then use quote to turn syntax trees back into tokens or strings.
Let's Write a "The Wicker Man" Macro
First, some context:
Let's lay out the requirements for our macro. We want to create a custom attribute that a user can only apply to a struct definition. If the user applies the attribute to an enum, function, etc, we should generate a compiler error. If the struct has a field named "bees," we want the compiler to lose its mind.
I've posted the code for this macro on GitHub so you can do all kinds of crazy things with it. If you're reading this post to learn procedural macros for the first time, take a look at the commit history of the repo to see how I put the macro together piece by piece. I've largely followed the same process in the sections that follow.
Getting Started
Here's the most barebones version of our macro crate:
#![feature(proc_macro)]

extern crate syn;
extern crate proc_macro;

use proc_macro::TokenStream;

#[proc_macro_attribute]
pub fn not_the_bees(_metadata: TokenStream, input: TokenStream) -> TokenStream {
    input
}
This obviously doesn't do any of the devious things that we want, but it does compile. That's a start.
Next we try to parse the input into a syn::Item using the syn::parse function. In syn parlance, an Item is a syntax tree that can appear at the module level, which includes things like function, struct, and enum definitions. If parsing fails (maybe we're trying to parse something that isn't an Item), we'll panic with the given error message.
// Parse the `TokenStream` into a syntax tree, specifically an `Item`. An `Item` is a
// syntax item that can appear at the module level i.e. a function definition, a struct
// or enum definition, etc.
let item: syn::Item = syn::parse(input).expect("failed to parse input");

// Use `quote` to convert the syntax tree back into tokens so we can return them. Note
// that the tokens we're returning at this point are still just the input, we've simply
// converted it between a few different forms.
let output = quote!{ #item };
output.into()
Parsing moves the syntax tree, so we can't get away with just converting input back into proc_macro::TokenStream. We could just clone input to return a copy of it, but instead we'll introduce the quote! macro. The quote! macro lets you write normal Rust code, insert syntax trees into it, and get tokens back. In this case I'm just turning the parsed Item back into tokens. This is the extent to which we'll be using quote in this post, but you can see how to generate more complicated code in the lazy_static! example from syn.
Examining the Syntax Tree
A quick perusal of the docs for syn::Item reveals that there are quite a few things that could be considered items. We're only looking for syn::Item::Struct, so we'll use a match statement:
// Match on the parsed item and respond accordingly.
match item {
    // If the attribute was applied to a struct, we're going to do
    // some more work to figure out if there's a field named "bees".
    // It's important to take a reference to `struct_item`, otherwise
    // you partially move `item`.
    Item::Struct(ref struct_item) => {
        if has_bees(struct_item) {
            light_it_up(struct_item);
        }
    },

    // If the attribute was applied to any other kind of item, we want
    // to generate a compiler error.
    _ => {
        // This is how you generate a compiler error. You can also
        // generate a "note," or a "warning."
        item.span().unstable()
            .error("This is not a struct")
            .emit();
    },
}

/// Determine if the struct has a field named "bees"
fn has_bees(struct_: &syn::ItemStruct) -> bool {
    unimplemented!()
}

/// Generate fun compiler errors
fn light_it_up(struct_: &syn::ItemStruct) {
    unimplemented!()
}
I like to keep things nice and tidy, so I've introduced two new functions, has_bees and light_it_up, to move some of the code out of the match statement. Notice that each function takes a reference to a syn::ItemStruct, and that I'm passing struct_item rather than &struct_item to each function. I just want to look at the contents, not take them, so I destructure with ref here.
The other thing to take not of is how I generate the compiler error:
item.span().unstable()
    .error("This is not a struct")
    .emit()
The trait syn::spanned::Spanned allows you to retrieve the span of any syntax tree defined by syn, so you'll want to bring that into scope. Why is the unstable() there? I have no idea, but you need it. Rather than error you could also use warning, note, or help. See this page for details.
Finding a named field
Let's dig into the has_bees function. We want has_bees to examine the syntax tree and return true or false depending on whether there is a field in the struct named "bees." To do that we're going to need to dig into the definition of syn::ItemStruct. I'll just show you what this looks like.
// from the `syn` docs

pub struct ItemStruct {
    pub attrs: Vec<Attribute>,
    pub vis: Visibility,
    pub struct_token: Struct,
    pub ident: Ident,
    pub generics: Generics,
    pub fields: Fields,
    pub semi_token: Option<Semi>,
}

pub enum Fields {
    Named(FieldsNamed),
    Unnamed(FieldsUnnamed),
    Unit,
}

pub struct FieldsNamed {
    pub brace_token: Brace,
    pub named: Punctuated<Field, Comma>,
}

pub struct Field {
    pub attrs: Vec<Attribute>,
    pub vis: Visibility,
    pub ident: Option<Ident>,
    pub colon_token: Option<Colon>,
    pub ty: Type,
}
Yikes, that's quite the rabbit hole. Unfortunately, this is the price you pay for all of the goodies that syn gives you for free. Alright, here's what we're going to do:
- match on
fields - destructure the
Namedvariant to bind its contents to a variable - use the iterator methods provided by
Punctuatedto iterate over the fields - compare the
ident(name) of each field with "bees"
/// Determine if the struct has a field named "bees"
fn has_bees(struct_: &syn::ItemStruct) -> bool {
    match struct_.fields {
        // A field can only be named "bees" if it has a name, so we'll
        // match those fields and ignore the rest.
        Fields::Named(ref fields) => {
            // Unwrap the field names because we know these are named fields.
            fields.named.iter().any(|field| field.ident.unwrap() == "bees")
        }
        // Ignore unit structs or anonymous fields.
        _ => {
            false
        },
    }
}
Note that I'm able to directly compare the ident with a value of type &str even though ident is of type syn::Ident. This is because Ident implements PartialEq<T: AsRef<str>>, or, in other words, Ident can be compared with types that can be converted to &str. Nice! Although you don't need to explicity convert the Ident to a &str or String for the sake of comparison (remember, the PartialEq implementation does it for you), you can still get the textual representation of ident using its as_ref or to_string methods.
Another thing to point out is that I'm unwrapping ident, which is of type Option<Ident>. This seems odd at first glance. We know that the fields are named because they come from the Fields::Named variant, but the type of each field is Option<Ident>, which suggests that there is some uncertainty as to whether the field actually has a name. According to David Tolnay, one of the authors of syn, this is a trade off. On one hand, it would make more sense to use just Ident in this situation, rather than Option<Ident>. On the other hand, using Option<Ident> for the type of Field.ident allows you to treat named and unnamed fields mostly the same, which makes sense from an API and maintenance point of view. Interesting!
Generating the compiler errors
Now that we've seen how to locate the fields of a struct and generate a compiler error, let's go ahead and do this in our light_it_up function (it will look very similar to has_bees).
/// Generate fun compiler errors
fn light_it_up(struct_: &syn::ItemStruct) {
    if let Fields::Named(ref fields) = struct_.fields {
        // Piece together our exquisite error message.
        let bees = "🐝 ".repeat(17);
        let msg = "🐝   not the bees!!! NOT THE BEEEEEES!!! 🐝";
        // The `join` method places the provided string between the joined items,
        // so putting empty strings at the beginning and end will put extra
        // newline characters at the beginning and end of the error message.
        let bees_msg = ["", bees.as_str(), msg, bees.as_str(), ""].join("\n");
        // Find the field named "bees".
        for field in &fields.named {
            let ident = field.ident.unwrap();
            if ident == "bees" {
                // Deliver the error message.
                ident.span().unstable()
                    .error(bees_msg.clone())
                    .emit();
            }
        }
    }
}
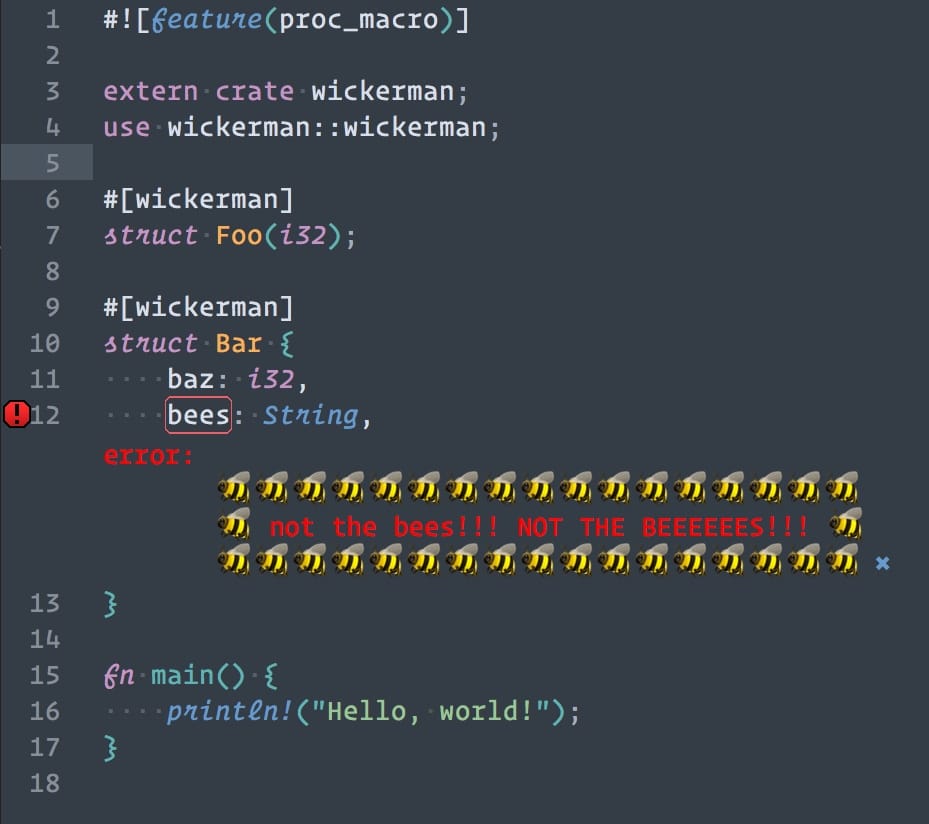
Now we'll make a simple example to show that it works:
#![feature(proc_macro)]

extern crate wickerman;
use wickerman::wickerman;

/// This one shouldn't raise any errors because it doesn't have a field
/// named "bees", or any named fields at all for that matter.
#[wickerman]
struct Foo(i32);

/// This is where the action will happen.
#[wickerman]
struct Bar {
    baz: i32,
    bees: String,
}

/// This is only here so that the crate will run as a binary crate
fn main() {
    println!("Hello, world!");
}
*crosses fingers*
BINGO! At 1:30am this was basically the funniest thing I had ever seen. I laughed myself to sleep.
Now, there is some weirdness involved. At first the errors only showed up when I tried to build the example in my terminal. I'm guessing I had to build both the wickerman crate and the example before the error messages would show up in my editor (Sublime Text). I would also like to point out that things may look different in your editor or your terminal because Unicode Is Hard (TM). I know that the error message doesn't look like this (different spacing) in either iTerm2 or the built in terminal on macOS, and each terminal renders it differently. I think the issue lies in the width of the bee emoji. I'm not all that concerned about it.
Blowing up the editor
We're generating an error message for the field named "bees," but I said I wanted the compiler to lose its mind. So, here's what I want to do: if I find the "bees" field, I'll show the bees error message, but for every other field and its type I'll show a random error message inspired by The Wicker Man. First, some inspiration (WARNING: GRATUITOUS AMOUNTS OF 240p):
Now let's get to work. The first order of business is creating a function to return a random error message. Here's the outline:
fn random_error_message(name: &str) -> String {
    // Create the error messages...

    // Store the error messages in an array so one can be chosen at random. We use an array
    // rather than a `Vec<String>` because we know exactly how many error messages we have,
    // and we know the number will never change.
    let messages = [
        // List the error messages here.
    ];

    // Use the `rand` crate to choose a random message to return. Note that `choose` returns
    // `Option<&T>`, which will only be `None` if `messages` is empty, so it's safe to unwrap
    // here. Unwrapping gives us `&String`, so we call `to_owned` to return `String`.
    rand::thread_rng().choose(&messages).unwrap().to_owned()
}
The next step is to apply the error messages to the other syntax items. I'll do this by adding an else branch to the if ident.as_ref() = "bees" conditional statement in light_it_up:
if ident.as_ref() == "bees" {
    // You've already seen this part.
} else {
    // Here's where the new stuff will go.
}
First I'll attach an error message to the identifier (the name of the field), and then I'll attach an error message to the type of the field.
if ident.as_ref() == "bees" {
    // You've already seen this part.
} else {
    // Show a random error message referencing the name of the field.
    ident.span().unstable()
        .error(random_error_message(ident.as_ref()))
        .emit();
    // Show a random error message referencing the type of the field.
    field.ty.span().unstable()
        .error(random_error_message(""))
        .emit();
}
Alright, all the pieces are in place! Let's see what it looks like!
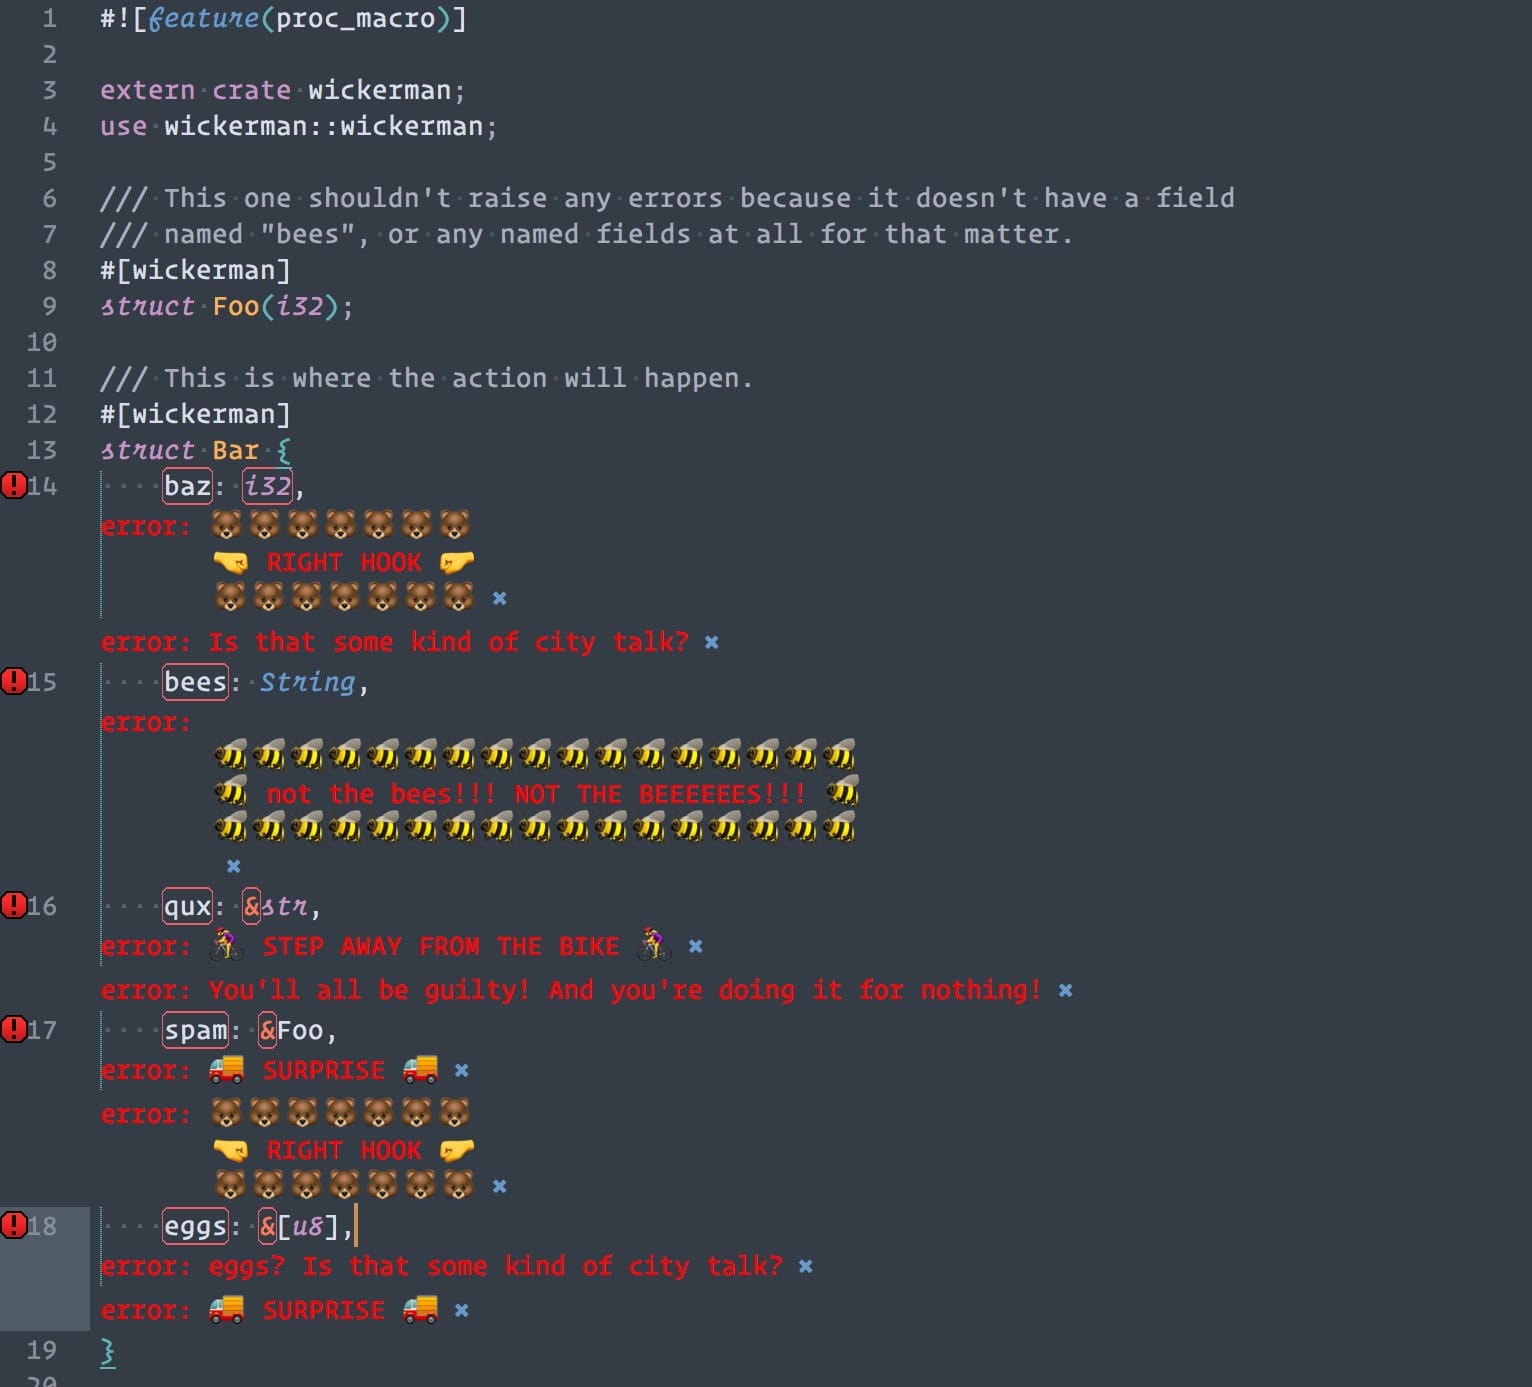
BEAUTIFUL! I'm pretty happy with how this looks. To satisfy the purists, I added some feature flags to the wickerman crate. The default feature is just-the-bees-please, which will only show the "not the bees!" message. The other feature is go-nuts, which will show the randomly selected error messages on the other fields and types. I did this using the cfg! macro:
if ident.as_ref() == "bees" {
    // Take the pedestrian way out.
} else if cfg!(feature = "go-nuts") {
    // Let's get weird.
}
This is the first time I've used feature flags in one of my own crates. Do they make "Baby's First Conditional Compilation" refrigerator magnets? Someone look into it and let me know.
Summary
If you've read this far, you're a saint. Hopefully you got something out of it. Like some other nightly features of Rust, procedural macros are a bit of a moving target. I've done my best to make sure everything was up to date, but if you find something that's out of date be sure to let me know!